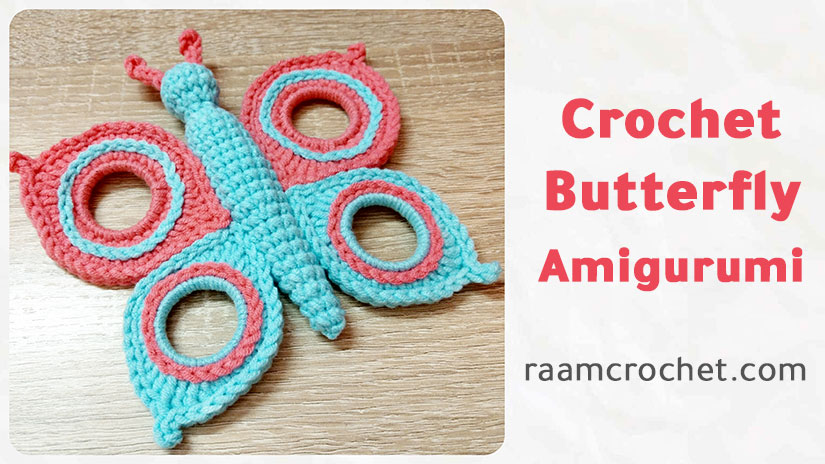
Crochet amigurumi butterfly, I used plastic rings in the wings to give it support. The pattern might seem hard but it’s really easy and fun to make.
Designer: Nada
Skill level: Intermediate
Size: One size
Materials
Yarn (2 – 3) colors with suitable crochet hook
Use something similar to alize cotton gold plus with 4 mm crochet hook
Needle
Stuffing
4 plastic rings (you can find it under the water bottle cap, it’s about 3 cm diameter)
Sewing thread and needle for sewing parts (optional)
Terms
MR – Magic ring
st – stitch
sl st – slip stitch
ch – chain
sc – single crochet
hdc – half double crochet
dc – double crochet
P – Picot stitch (ch 3, sl st 3rd ch from the hook)
Special terms
Invisible slip stitch/Invisible join
With amigurumi I always use the cross single crochet instead of the regular one (optional)
I used surface crochet to decorate the wings, also optional
Crochet Butterfly Amigurumi
Directions
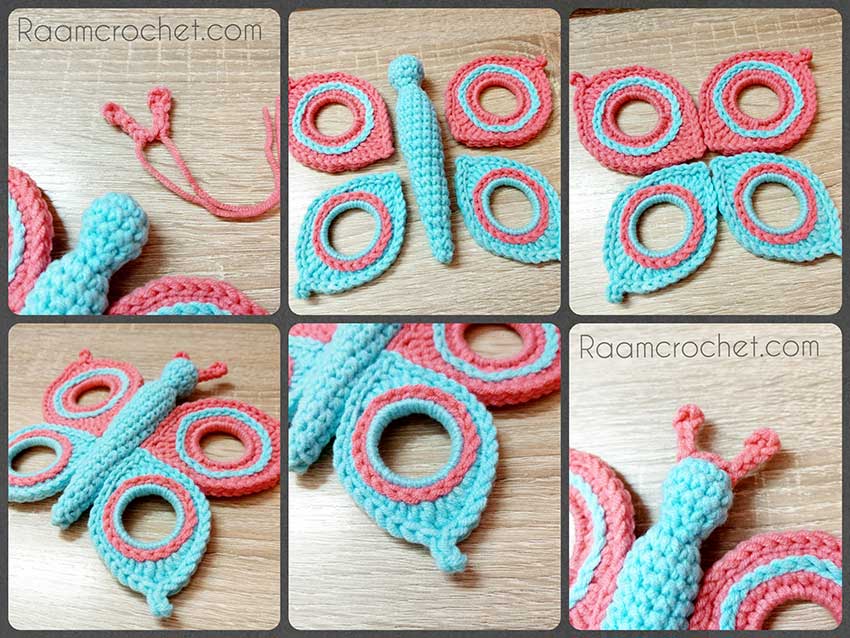
The butterfly contain three main parts, body, wings and antennae. Each wing contain two parts, one is bigger than the other slightly.
Butterfly body
It contain the head and the rest of the body. Stuff as you go.
Rnd 1: MR, 6 sc in the ring. (6 sc)
Rnd 2: 2 sc each st. (12 sc)
Rnd 3 – 4: Sc each st. (12 sc)
Rnd 5: Sc2tog 6 times. Stuff the head. (6 sc)
Rnd 6: Sc each st. (6 sc)
Rnd 7: 2 sc each st. (12 sc)
Rnd 8 – 16: Sc each st. (12 sc)
Rnd 17: *Sc2tog, sc in each of next 2 sts* repeat 3 times. (9 sc)
Rnd 18 – 22: Sc each st. Start stuffing. (9 sc)
Rnd 23: *Sc2tog, sc* repeat 3 times. (6 sc)
Rnd 24 – 26: Sc in each st. Sl st at the end of the pattern. Complete stuffing the body. (6 sc)
FO, sew the last round gap and weave in ends.
Butterfly wings
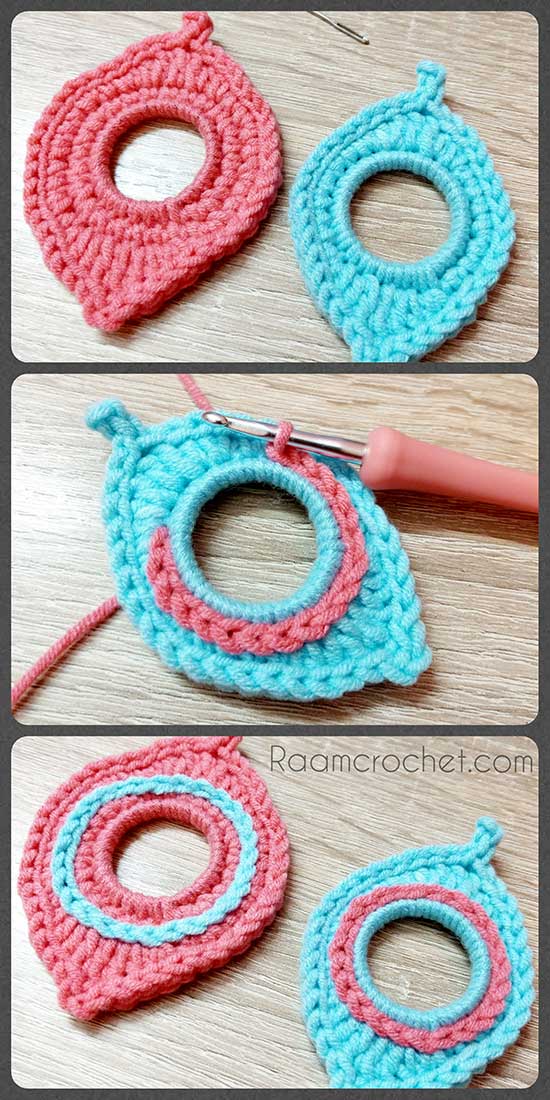
Each wing contain two parts, one is small the other is large.
The small part of the wing
Make two pieces of the following pattern.
Rnd 1: Crochet 24 sc around the plastic ring. (24 sc)
Rnd 2: *Sc in each of next 3 sts, 2 sc, sc in each of next 3 sts, [sc, hdc] next st, [hdc, dc] nex st, dc, [dc, hdc] next st, [hdc, sc] next st* repeat twice.
Rnd 3: Sl st in each of next 12 sts, [sl st, picot, sl st] next st, sl st in each of next 17 sts, ch 2, sl st in each of next 4 sts. FO and weave in ends.
Decorate your piece with surface crochet as you like.
The large part of the wing
Make two pieces of the following pattern.
Rnd 1: Crochet 24 sc around the plastic ring. (24 sc)
Rnd 2: Sc, 2 sc, sc in each of next 3 sts, 2 sc, sc in each of next 7 sts, 2 sc, sc in each of next 3 sts, 2 sc, sc in each of next 6 sts. (28 sc)
Rnd 3: *Sc, 2 sc, sc in each of next 2 sts, 2 sc, sc in each of next 2 sts, 2 sc, sc, [sc, hdc] next st, [hdc, dc] next st, dc, [dc, hdc] next st, [hdc, sc] next st* repeat twice.
Rnd 4: Sl st in each of next 16 sts, [sl st, picot, sl st] next st, sl st in each of next 21 sts, ch 2, sl st in each of next 4 sts. FO and weave in ends.
Decorate your piece with surface crochet as you like.
Butterfly antennae
Ch 7, sl st 5th ch from the hook, sl st in each of next chs, ch 9, sl st 5th ch from the hook, sl st in each of next 2 chs. FO leaving long tail for sewing.
Sewing parts
I used sewing thread and needle to sew the parts of the butterfly (except the antennae) because it’s easer, you can use same yarn as usual.
Sew each wing firs by sewing the small part to the large one. Make sure the picot stitches are facing out.
Sew the antennae on top of the head.
Sew the two wings at the sides of the body.
Share your final products with us at #raamcrochet on any social media.
List of free English crochet patters
Terms of Use Contact Us