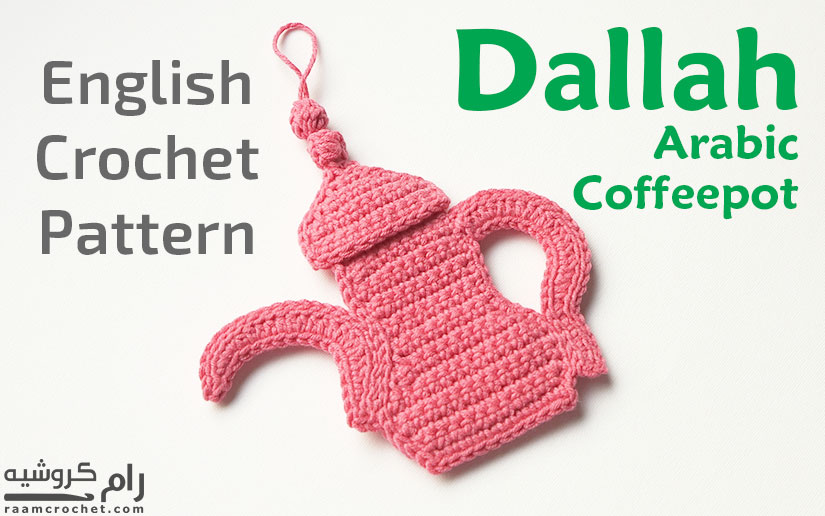
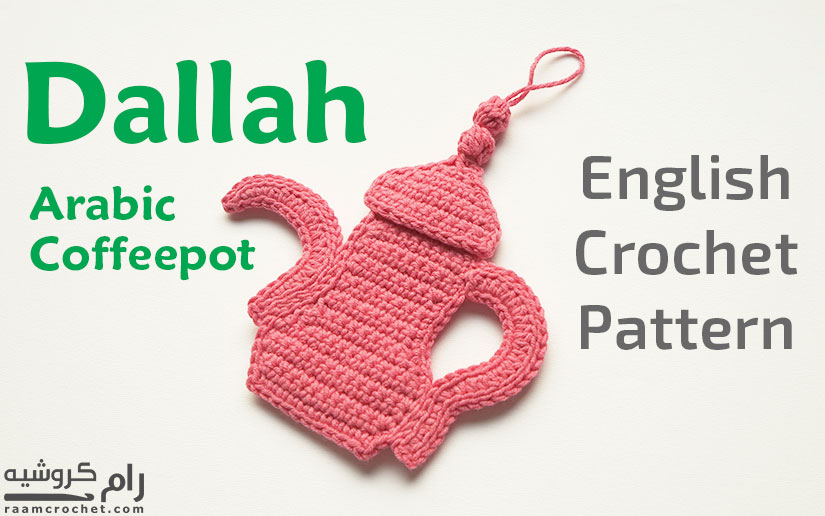
Today we’ve a very special and unique pattern. Finally I’m sharing crochet Dallah that I’ve been working on. If you don’t know what “Dallah” mean, it’s an Arabic coffeepot. This pattern is perfect for gifts and home decorations.
Designer: Nada
Skill level: Easy / Intermediate
Size: Free
Materials:
Medium thickness cotton yarn or amigurumi yarn with suitable crochet hook
Needle
Terms:
st – stitch
sl st – slip stitch
ch – chain
sc – single crochet
hdc – half double crochet
sc2tog – 2 single crochet together
BL – back loop only
FL – front loop only
C – cluster stitch
Notes:
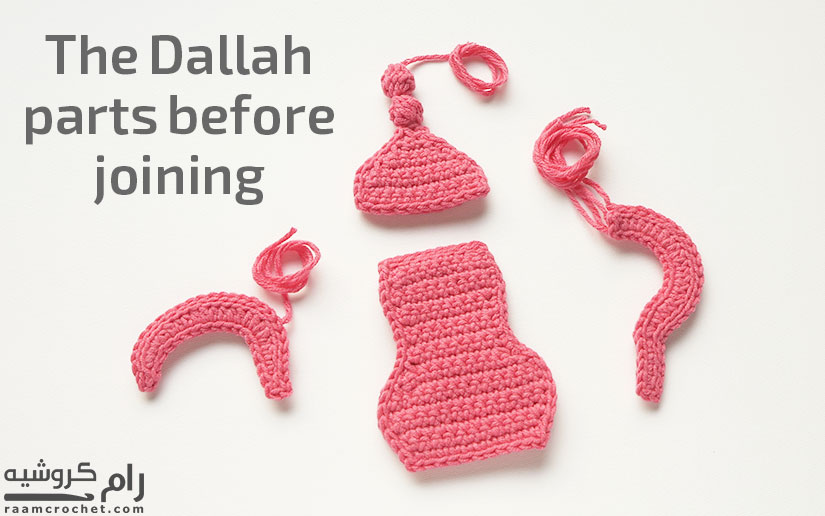
The Dallah will have four parts. Two layers of each part.
The parts are the body, handle, lid and spout.
We’ll crochet each part individually joining the layers by slip stitching. After that we’ll sew them together.
If your yarn is very soft and the Dallah didn’t hold its shape you can try to line it with felt fabric.
Directions:
The Body
Make two pieces of the pattern. Do not FO after the second one.
R 1: Slip knot, ch 11, sc 2nd ch from the hook, sc each st. (10 sc)
R 2: Ch 1, turn, 2 sc, sc in each of next 8 sts, 2 sc last st. (12 sc)
R 3: Ch 1, turn, 2 sc, sc in each of next 10 sts, 2 sc last st. (14 sc)
R 4 – 6: Ch 1, turn, sc in each st. (14 sc)
R 7: Ch 1, turn, sc2tog, sc in each of next 10 sts, sc2tog. (12 sc)
R 8: Ch 1, turn, sc2tog, sc in each of next 8 sts, sc2tog. (10 sc)
R 9: Ch 1, turn, sc2tog, sc in each of next 6 sts, sc2tog. (8 sc)
R 10 – 13: Ch 1, turn, sc in each st. (8 sc)
R 14: Ch 1, turn, 2 sc, sc in each of next 7 sts. (9 sc)
R 15: Ch 1, turn, 2 sc, sc in each of next 8 sts. (10 sc)
R 16 – 17: Ch 1, turn, sc in each st. (10 sc)
R 18: Ch 1, turn, sc2tog, sc in each of next 8 sts. (9 sc)
R 19: Ch 1, turn, sc2tog, sc in each of next 7 sts. (8 sc)
FO after the first piece. Do not FO after the second one and complete the joining steps.
Joining
Put the working piece (second one) on top of the first one. Do not turn at all while joining. Make your slip stitches a little bit loose. Use one loop of each layer and if there were two loops in one side use the inner one.
Joining steps
• Ch 1, sl st along side the Dallah from top to bottom, one sl st for each row. (19 sl st)
• Ch 1, sl st in each st of the bottom. (10 sl st)
• Ch 1, sl st along side the Dallah from bottom to top, one sl st for each row. (19 sl st)
• Ch 1, sl st in each st of the top. (8 sl st)
• FO and weave in ends.
The Handle
Make two pieces of the pattern. Do not FO after the second one.
R 1: Slip knot, ch 21, sc 2nd ch from the hook, sc in each of next 3 sts, sc2tog twice, *hdc, 2 hdc* repeat 6 times.
FO after the first piece. Do not FO after the second one and complete the joining steps.
Joining
Put the working piece (second one) on top of the first one. Do not turn at all while joining. Make your slip stitches a little bit loose. Use one loop of each layer.
Joining steps
• Ch 1, sl st next edge. (1 sl st)
• Ch 2, sl st in each st of next sts of next edge. (20 sl st)
• Ch 1, sl st next edge. (1 sl st)
• Ch 1, sl st BL in each of next sts of next edge. (24 sl st)
FO leaving long tail for sewing.
The Spout
Make two pieces of the pattern. Do not FO after the second one.
R 1: Slip knot, ch 19, sl st 2nd ch from the hook, sc in each of next 2 sts, hdc, 2 hdc in each of next 2 sts, *2 hdc, hdc, hdc* repeat twice, 2 hdc, hdc, 2 sc in each of next 2 sts, sl st in each of next 2 sts.
FO after the first piece. Do not FO after the second one and complete the joining steps.
Joining
Put the working piece (second one) on top of the first one. Do not turn at all while joining. Make your slip stitches a little bit loose. Use one loop of each layer.
Joining steps
• Ch 1, sl st in each of next sts of next edge. (18 sl st)
• Ch 1, sl st next edge. (1 sl st)
• Ch 1, sl st in each of next sts of next edge. (25 sl st)
• FO leaving long tail for sewing.
The Lid
Make two pieces of the pattern. Do not FO after the second one. We’ll crochet the pointed tip while joining the two layers.
R 1: Slip knot, ch 11, sc 2nd ch from the hook, sc in each st. (10 sc)
R 2: Ch 1, turn, 2 sc, sc in each of next 8 sts, 2 sc last st. (12 sc)
R 3: Ch 1, turn, sc2tog, sc in each of next 8 sts, sc2tog. (10 sc)
R 4: Ch 1, turn, sc2tog, sc in each of next 6 sts, sc2tog. (8 sc)
R 5: Ch 1, turn, sc2tog, sc in each of next 4 sts, sc2tog. (6 sc)
R 6: Ch 1, turn, sc2tog, sc in each of next 2 sts, sc2tog. (4 sc)
R 7: Ch 1, turn, sc2tog twice. (2 sc)
R 8: Ch 1, turn, sc2tog. (1 sc)
FO after the first piece. Do not FO after the second one. We’ll crochet the pointed tip while joining the two layers.
Joining
Put the working piece (second one) on top of the first one. Do not turn at all while joining. Make your slip stitches a little bit loose. Use one loop of each layer. We’ll not join the bottom side of the lid.
Joining steps
• Ch 1, 8 sl st evenly along side next edge. (8 sl st)
• Ch 1, using the upper layer of the lid only, sl st each st. (10 sl st)
• Ch 1, working through two layers as usual now, 8 sl st evenly along side next edge. (8 sl st)
• Ch 1, sl st using the inner loops of the top st of each layer. (1 sl st)
• Do not FO. Complete working the pointed tip.
The lid pointed tip
• Ch 2, [4 dc cluster st] same st, *ch 2, [4 dc cluster st]* repeat 3 times. (4 cluster st)
• FO leaving long tail to sew the pointed tip.
• If the clusters are stiff try pulling them by hand a little bit.
• Fold the line of clusters in half.
• Using the needle sew the upper side of the cluster that we folded to the upper side of the lid.
• Wrap the remaining tail of yarn around the small section of the clusters to give a better look.
• Secure the tail and weave in ends.
Sewing the Dallah parts
• Use the remaining tail and needle of each part.
• To sew the handle, starting down the right side of the dallah, skip 2 sts, start sewing the down side of the handle along 4 to 5 sts of the dallah, sew the upper part of the handle along 3 sts of the upper side of the dallah. FO and weave in ends.
• To sew the spout, skip 5 sts down the left side of the dallah, start sewing the spout along side 10 sts of the dallah. FO and weave in ends.
• Sewing the lid is optional. Cut a new piece of yarn to sew the lid, insert a very small section of the upper side of the dallah inside the lid then sew along side it. FO and weave in ends.
You Dallah is ready!
Share your final products with us at #raamcrochet on any social media.
List of free English crochet patters
Terms of Use
Contact Us